NOTE: The article below describes how to create and save an audio recording in Windows 10. For recording announcements and auto-attendants in your E Street Voice Pilot Digital Voice products, these are best done with your phone – see https://estreet.com/knowledge-base/recording-announcements-and-auto-attendants-with-voice-pilot-hosted-systems/
~~~~~~~~~~~~~~~~~
To Create an audio recording in Windows 10:
Use “Voice Recorder” app (formerly known as “Sound Recorder”) in Windows 10. (A microphone installed on your computer will be required)
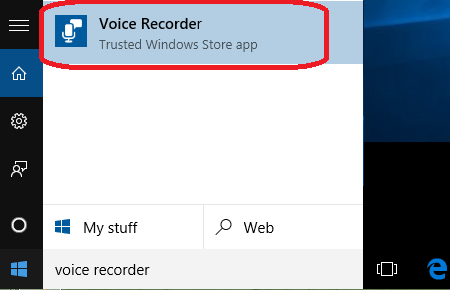
To launch Voice Recorder in Windows 10, type “voice recorder” in Cortana’s search box and click or tap the first result that shows up. You can also find its shortcut in the Apps list, by clicking on the Start button.
When you finished recording, click the Stop button. Listen and confirm the voice recording meets your needs.
~~~~~~~~~
Once you’ve recorded your greeting, if you choose to you can go to the main software screen to EDIT the voice recordings, such as add markers to identify key moments, share, trim, rename, or delete your recordings.
If your file is complete and ready to use – your recordings will appear in the upper left pane of Voice Recorder with a Date/Time stamp on them.
To access the actual file you created, Right-click on the voice recording and choose “Open file location”, this will open the file in the folder where all your audio recording files are saved (typically saved as “m4a” file format).

Procedure for older OS’s with Windows “Sound Recorder” and other audio apps:
Use this procedure to record a personal greeting or announcement using a PC to create a .wav file that can be used for a voice mail greeting in the Voice Pilot system. These can also be used in Auto Attendants, Call Center Queue and any other area of the Broadsoft system that requires an uploaded .wav file.
Instructions are provided for the following Sound Recorders for Windows XP and earlier.
If you are using a different sound recording product, note that the required format for recordings is as follows:
*CCITT u-Law or A-Law
*8.000 kHz
*8 bit Mono
*.WAV file type
~~~~~~~~~~~~~~~~~~~~~~~~~~~~~
General recording instructions are below – Click the link below for detailed recording instructions using ‘Sound Recorder’ on Windows XP:
https://kb.estreet.com/artImages/record_autoattendant.pdf
1. In Windows, select Start>Programs>Accessories>Multimedia>Sound Recorder from the Windows task bar.
In Windows XP, select Start>All Programs>Accessories>Entertainment>Sound Recorder.
NOTE: It is possible that your Sound Recorder is located in a different file, or that your default sound recorder is another product. Please note the required format for your greetings below and follow the instructions for your specific sound recording product.
2. Make the setting selections. Click Properties from the File menu. The properties for Sound window appears.
3. Click Convert Now and then click OK. The Sound Selection page appears.
4. Select CCITT u-Law from the Format list.
5. Select 8.000 kHz, 8 bit Mono, under Attributes, and click OK. You may want to save this format at this point, so that you can easily select it in the future.
6. In the Properties for Sound dialog box, click OK.
7. Click Record on the Sound Recorder. Speaking clearly into your PC microphone, record your message. When you have finished, click Stop. To listen to your message, click Play. If you are not pleased with your message, record it again.
8. When you are satisfied with your message, select Save As from the File menu. Name your sound file, being certain that you remember its location and that the file type is a .WAV file.
9. In the File name field, enter the desired name of your recording.
10. Click OK. To exit without saving, click Cancel.